Sienci Labs LongMill MK2 30x30 CNC Router Available Cert Required
Back to Equipment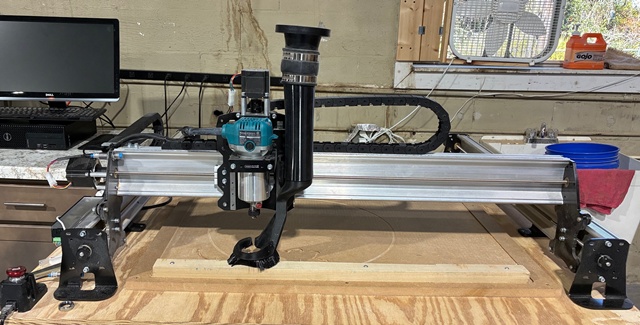
The Sienci Labs LongMill MK2 is a hobby-grade benchtop CNC router designed for accessibility, reliability, and ease of use. Built with extruded aluminum rails, fully supported Y-axes, 1/4-inch steel gantries, and high-power NEMA 23 stepper motors, the LongMill MK2 delivers strong rigidity and precision at an affordable price point. The machine uses a lead screw motion system with anti-backlash nuts on all axes, providing accurate positioning without the cost of ball screws. V-wheel linear bearings on the X and Y axes and MG-12 type linear guides on the Z-axis provide smooth, reliable movement. Cutting speeds reach approximately 150 inches per minute. This LongMill is equipped with a Makita RT0701C compact trim router mounted in a 65mm mount. The router provides variable speed from 10,000 to 30,000 RPM and accepts 1/4-inch shank bits. Router speed is set manually via the dial on the router body and must be turned on and off manually at the start and end of each cutting program. The machine cuts a wide range of materials including softwoods, hardwoods, MDF, plywood, plastics, foams, acrylics, and aluminum (with patience and appropriate feeds/speeds). The working area is approximately 30 by 30 inches with a Z-axis travel of approximately 4.5 inches. The LongMill is controlled using gSender, Sienci Labs' free CNC control software, running on the adjacent computer. Designs are created and toolpaths generated using VCarve CAM software. Reservation is required before use.
- Reservation is required before using the CNC router. Check the reservation system for available time slots.
- Ensure the work area is clean and free of debris. Inspect the wasteboard for excessive wear.
- Power on the SuperLongBoard controller using its power switch.
- Turn on the computer and launch gSender. Connect to the LongMill via USB.
- Home the machine if inductive sensors are installed, or manually jog to your preferred starting position.
- Select and install the appropriate 1/4-inch shank bit into the Makita router collet. Tighten securely using the provided wrenches.
- Secure your workpiece to the wasteboard using clamps, screws, or double-sided tape as appropriate for the material and operation.
- In gSender, jog the router to your desired X-Y zero position on the workpiece. Set the X and Y zero.
- Set the Z zero using the touch plate or by manually jogging the bit down to the material surface.
- Open VCarve on the workstation. Create or open your design and generate toolpaths with appropriate feeds, speeds, and depth settings for your material.
- Export the toolpath as a G-code file and load it into gSender.
- Verify the toolpath by reviewing the preview in gSender. Ensure the cutting area is within bounds.
- Attach the dust collection hose to the dust shoe if available.
- Set the Makita router speed dial to the appropriate setting for your material and bit. Turn the router on manually.
- Run the G-code program from gSender. Stay near the machine and monitor the cut.
- When the program completes, turn off the Makita router manually.
- Remove your workpiece and clean up all chips and dust. Vacuum the wasteboard and surrounding area.
- Return any tooling to its proper storage location. Power down the controller when finished.
- CNC Routing Certification (Category)